<![CDATA[Keith Smiley]]>2025-03-25T16:03:09-07:00http://smileykeith.com/Copyright (c) 2025 Keith SmileyJekyll<![CDATA[Finding unused targets with bazel]]>http://smileykeith.com/2025/03/24/unused-bazel-targets2025-03-24T11:00:00-07:00
Once you've fully migrated a codebase to bazel, one of the many
advantages is that you can easily inspect your build graph using bazel
query.
One of the many things you can do with queries is write scripts to
enforce coding standards, or in today's example, find unused targets
that can lead to discovering unused code.
The simplest version of this query starts like this:
let all_targets = //... in
let top_level_targets = tests($all_targets) union kind("(.*_binary) rule", $all_targets) in
$all_targets - deps($top_level_targets)
This initial version discovers all your first party targets, and then
subtracts the dependencies of all "top level" targets, so that any
remaining targets are considered unused.
The idea of "top level" targets is better defined as: anything that you
consider to be important enough that its dependencies are used.
Depending on your codebase you might want to exclude test targets from
this so that targets only in the dependencies of test targets are
diagnosed as unused (this won't work if you have intentional testonly
dependencies, although you could special case those as shown below).
Once you have this initial query, you can start iterating in order to
handle in edge cases. For example it's likely that you have some targets
that aren't binaries or tests, but are considered used. There are 2
approaches I would recommend to handle this. First you can continue to
build out the kind filter:
The downside with this approach is it can get unwieldy quickly. I like
adding rules here that have many uses, but for other one off cases
another approach you can use is to expand the query to look for special
tags:
let all_targets = //... in
let top_level_targets = tests($all_targets) union kind("(.*_binary|platform|test_suite) rule", $all_targets) in
let allowed_unused = attr(tags, allow-unused, $all_targets) in
$all_targets - deps($top_level_targets) - $allowed_unused
Then you can add tags = ["allow-unused"] to whatever targets that you need.
Similarly if you want to special case targets that can be considered
"top level" you can use a tag for that case as well:
let all_targets = //... in
let top_level_targets = tests($all_targets) union kind("(.*_binary|platform|test_suite) rule", $all_targets) union attr(tags, top-level, $all_targets) in
let allowed_unused = attr(tags, allow-unused, $all_targets) in
$all_targets - deps($top_level_targets) - $allowed_unused
Now adding tags = ["top-level"] to various targets will ensure their
entire dependency tree is also considered used. This case is especially
useful for targets like CC toolchains which are used in your
MODULE.bazel but potentially don't appear as used by bazel query.
Hopefully this post was instructive and gives you some ideas for how you
can write more advanced queries for your use cases.
]]>
<![CDATA[Bazel caching and compressed debug info]]>http://smileykeith.com/2025/02/14/compressed-debug-info2025-02-14T10:00:00-08:00
One of bazel's most attractive features is the ability for it to
remotely cache artifacts to reduce unnecessary work for large builds.
Unfortunately users quickly discover this comes with non-trivial
financial and bandwidth implications.
There are many ways, of varying difficulty, to try and improve your
cache usage. From breaking unnecessary dependencies, to adding
larger local storage for CI workers, builds without the bytes, build
avoidance, etc.
For codebases with lots of C or C++ one of the potentially easiest wins
is to enable compressed debug information1. Let's look at an example from
our codebase.
Looking at the size of a non-trivial C++ binary built with -g -O2
(similar to cmake's RelWithDebInfo configuration), or binary clocks in
at ~530mbs:
% du -sh bin
536M    bin
To get a sense of what percentage of this binary is debug info, we can
use llvm-objcopy to strip the debug info entirely:
% llvm-objcopy --strip-debug bin strippedbin
% du -sh strippedbin
159M    strippedbin
This shows us that almost 70%(!!) of the binary size is taken up with
debug info. In release configurations we can eliminate this entirely
with bazel's --strip argument, but for developer builds, or other use
cases where you need debug info, we can still improve this.
If we use llvm-objcopy again, this time to compress the debug info, we
can immediately see our potential gains:
% llvm-objcopy --compress-debug-sections bin compressedbin
% du -sh compressedbin
290M    compressedbin
This shows us we can get an almost 50%(!!) improvement in binary size in
this example.
To enable this in bazel, assuming you're using a relatively recent
version of gcc or clang, you can add something like this to your
.bazelrc2:
In practice we saw cache reads drop by nearly 60% when we rolled out
this change.
Reducing binary size with this approach has a lot of benefits, but it's
even more pronounced when using bazel and closely monitoring your cache
download sizes.
Passing these flags on macOS likely doesn't have a downside, but they are ignored ↩
]]>
<![CDATA[Printing rpaths with objdump]]>http://smileykeith.com/2022/03/16/objdump-rpaths2022-03-16T10:00:00-07:00
MachO binaries contain load commands to indicate to dyld where it should
search for the libraries the binary depends on.
These paths are often useful to inspect when debugging why your binary
isn't discovering the libraries you'd expect.
This example is quite verbose and fragile for such a common action, so
recently I committed a change to add an easier option with
LLVM's objdump. This change shipped with LLVM 13 or Xcode 13.3 on
macOS, allowing you to run:
This is much more succinct and memorable, but also has slightly
different output. This is because objdump automatically detects the
current machine's architecture, and only prints the rpaths for that
slice of the fat binary. It also outputs the path of the binary being
run on, which you can disable with --no-leading-headers.
Hopefully you find this as useful as I do!
]]>
<![CDATA[Debugging bazel actions]]>http://smileykeith.com/2022/03/02/debugging-bazel-actions2022-03-02T18:00:00-08:00
When working on bazel build infrastructure, something I often need to do
is reproduce an action outside of bazel's infrastructure in order to
debug it further. This debugging often involves changing flags or
swapping out the tool itself for a custom built version.
In many cases updating your bazel configuration as normal should work
well enough. But sometimes when you're iterating on things that
invalidate a significant portion of your build it can be faster to work
on things outside of bazel first, and then update your bazel
configuration based on your discoveries. Another case where this is
useful is if you want to benchmark a specific action by running it many
times individually without the contention caused by bazel parallelizing
other actions.
Since bazel has a lot of infrastructure for keeping builds hermetic,
there are a few steps you need to take to roughly reproduce what bazel
is doing so your debugging is as close to what it runs as possible.
1. Build and disable sandboxing
In order for bazel to setup your build environment (including your
downloaded dependencies), and leave it intact for you to muck around
with, you must run a normal build and also either disable sandboxing by
passing --spawn_strategy=standalone, or make it leave the sandbox base
around by passing --sandbox_debug.
2. Grab your action's command line
Once bazel has run and left its environment intact, you need to grab the
command line being run for the action you want to debug. I find that
passing bazel's -s flag (also known as --subcommands)
is the easiest way to do this. You just have to make sure that the
action you're interested in actually runs. There are a few different
ways you can force bazel to run an action:
Invalidate the inputs for the action. Unlike other build systems
touching input files isn't enough, I often add newlines or comments
to files to force actions to re-run.
Change the flags for a command line. For some actions such as C++
compiles, or native binary linking, there are easy command line flags
you can pass to invalidate the actions, specifically things like
--copt=-v and --linkopt=-v respectively. Another useful thing to
know is bazel doesn't have any semantics around the contents of these
flags, so if you need to invalidate the action a second time, you can
often append the same option again, repeating it, to make bazel re-run
it. For example --linkopt=-v --linkopt=-v, often the underlying tool
won't care about the repetition. This works best when changing flags
will only invalidate a small number of actions so you don't have to
rebuild a ton of things before you get to the action you care about.
Change flags on the specific target. If changing flags globally is too
invasive for your build, you can often edit the copts attribute of
the specific target you care about to invalid the action. Again
passing -v is often a useful way to get it to re-run without
changing semantics of the build. You can also do this with
--per_file_copt so you don't have to change any BUILD
files. Thanks to Tom Rybka for pointing this out.
Make it fail. Change the inputs or flags to something that is invalid,
then your bazel invocation will stop after hitting the action in
question.
Once you have forcibly re-run your action with -s, you should see some
output like this (specifics will vary based on your platform and the
action you're debugging):
Now that you have the environment and command line bazel ran, you can
roughly reproduce what it did in a few steps:
Switch to the directory it built in using the cd command it prints:
cd /private/var/tmp/_bazel_ksmiley/751b7cfc481e6eb168e92ffcfb919baa/execroot/someworkspace
Reproduce the environment variables it sets for the action:
At this point you're likely very close to reproducing what bazel was
running, but there are a few other things to keep in mind:
Bazel has some implicit environment variable manipulation in some
cases that you need to reproduce. For example for builds that rely on
Xcode on macOS, the Xcode discovery logic is done implicitly by bazel,
requiring you to approximate that logic yourself. To reproduce this
specific case you need to make sure to set DEVELOPER_DIR and
SDKROOT with something like1:
Some actions in bazel use a number of wrappers before getting down to
the actual command being run. In the example above universal_worker
is a pre-processor for the Swift command line. Sometimes you might
want to go a bit deeper in the stack. I often pass -v as an extra
argument to the wrapper invocation to get the final command line it
runs, and then iterate on that instead of the one bazel invokes.
Other environment variables can impact behavior. Depending on how you
run bazel normally and what you're debugging, this might matter as the
action may have access the environment variables that it wouldn't have
inside of bazel. This often doesn't make a difference if your build is
hermetic, but is worth keeping in mind (especially for PATH).
These steps may change over time. Ideally there would be a more
straightforward way to reproduce actions like this, potentially by
parsing bazel's execution log, but in the meantime this approach works
well in my experience.
]]>
<![CDATA[Auto linking with Mach-O binaries]]>http://smileykeith.com/2022/02/23/lc-linker-option2022-02-23T18:00:00-08:00
Auto linking is a feature that embeds information in your binaries' at
compile time which is then used at link time to automatically link your
dependencies. This allows you to reduce the duplication of flags between
the different phases of your (or your consumers') builds.
Now when linking this binary you don't have to pass any extra flags to
the linker to make sure you link Foundation:
$ ld foo.o -syslibroot `xcrun --show-sdk-path`
To compare, if you compile the binary without -fmodules1:
$ clang -c foo.m -o foo.o
You don't get any LC_LINKER_OPTIONs. Then when linking the binary with
the same command as before, it fails with these errors:
$ ld foo.o -syslibroot `xcrun --show-sdk-path`
Undefined symbols for architecture arm64:
  "_NSLog", referenced from:
      _main in foo.o
  "___CFConstantStringClassReference", referenced from:
      CFString in foo.o
ld: symbol(s) not found for architecture arm64
To make it succeed you must explicitly link Foundation through an
argument to your linker invocation:
$ ld foo.o -syslibroot `xcrun --show-sdk-path` -framework Foundation
Auto linking is also applied when using module maps that use the link
directive. For example with this module map file:
// module.modulemap
module foo {
 link "foo"
 link framework "Foundation"
}
That you include with in this source file:
@importfoo;intmain(){return1;}
And compile (with an include path to the module.modulemap file):
$ clang -fmodules -c foo.m -o foo.o -I.
The produced object depends on foo and Foundation. This can be
useful for handwriting module map files for prebuilt libraries, and for
quite a few other cases. You can read about this file format in the
docs.
You can also see auto linking with Swift code:
print("Hello, World!")
Compiled with:
$ swiftc foo.swift -o foo.o -emit-object
You can see it requires the Swift standard libraries:
For Swift this is especially useful since there are some underlying
libraries like libswiftSwiftOnoneSupport.dylib that need to be linked,
but should be treated as implementation details that Swift developers
are never exposed to.
In general, this is more than you'll ever need to know about auto
linking. But there are some situations where you might want to force
binaries to include LC_LINKER_OPTIONs when they don't automatically.
For example, if your build system builds without -fmodules (like bazel
and cmake by default) and for some reason you cannot enable it1, or
when you're distributing a library and don't want your consumers to have
to worry about adding extra linker flags.
There are 3 different ways you can explicitly add LC_LINKER_OPTIONs
during your builds. First you can pass a flag when compiling your
sources with clang:
These work perfectly for libraries you depend on, but for frameworks you
need to pass multiple flags, and because of the space between them, it
doesn't seem like there is a way to pass this with the current clang
flags (although it seems reasonable to add support for this). Luckily
the second option supports spaces in options. Instead of passing a flag,
you can add an assembly directive to one of the source files you're
compiling with clang:
Compiling this results in a binary that automatically links Foundation
and foo.
To see a real world example where this was helpful, check out this
change for building a static library from a C++ library that
requires some dependencies, but doesn't build with -fmodules.
You should try to enable modules if possible, this flag just shows
the difference in behavior. ↩↩2
]]>
<![CDATA[Silencing iOS simulator log noise]]>http://smileykeith.com/2021/11/16/simulator-log-spew2021-11-16T18:00:00-08:00
When Apple transitioned to using os_log for system logs it seemed they
also decided to open the floodgates for what logs were surfaced in our
apps.
This lead to a plethora of stackoverflow questions recommending you
disable os_log entirely by setting OS_ACTIVITY_MODE=disable in your
target's scheme. This is fine for some cases but might also silence some
actually useful logs, or your own logs if you want to use os_log for
its feature-set.
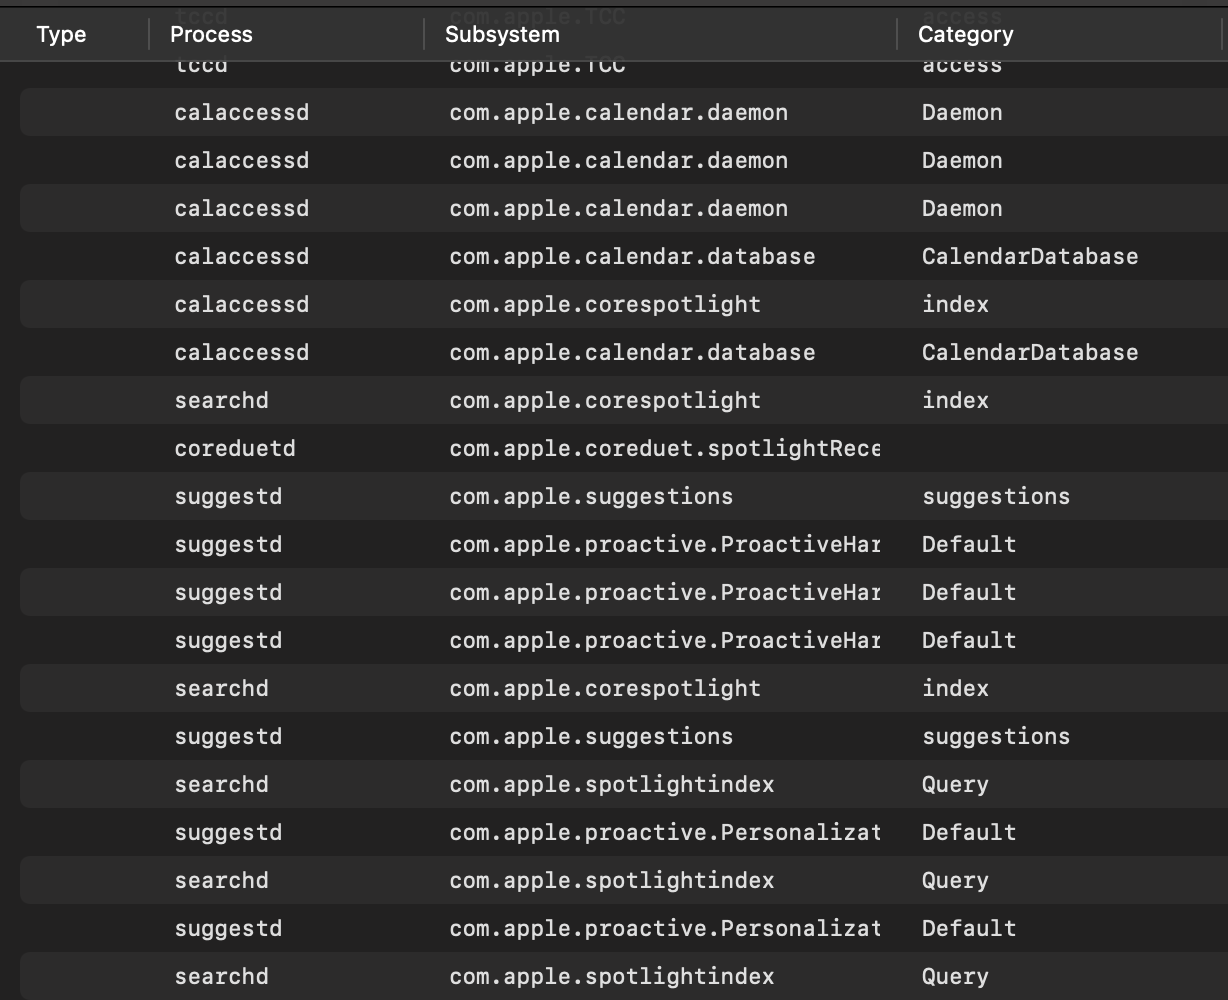
os_log has a nice set of categorization for logs, for example when
viewing streaming logs in Console.app you can show the process,
subsystem, and category for each log.
Perhaps ideally we could use an environment variable with more granular
filtering based on this categorization, but that would likely get
complex quickly. Instead we can update OS log's configuration to disable
some specific types of logs. Here are a few examples I found useful for
Lyft's iOS project:
You can replace booted here with a specific iOS simulator UDID, which
can be found by running xcrun simctl list devices. Since this is
simulator specific, you will have to re-run whatever commands you decide
on when you create new simulators.
More options for the log command can be found with man
log
]]>
<![CDATA[Reproducible codesigning on Apple Silicon]]>http://smileykeith.com/2021/10/05/codesign-m12021-10-05T20:00:00-07:00
For people who expect reproducible builds, Apple Silicon machines
provide an interesting challenge. Apple Silicon requiresarm64
binaries, including command line tools you build yourself, be
codesigned. This change is mostly transparent to developers, because
Apple updated their linker to automatically ad-hoc sign
binaries1. Unfortunately, if you're interested in producing binaries
that support both Intel Macs and Apple Silicon Macs, you likely want to
produce a fat binary. When codesigning this binary you hit
some behavior that depends on your current machine's architecture.
Example
You can consistently produce the same result across multiple machines
when compiling a binary without signing it. Here's an example with a
simple C program:
$ echo "int main() { return 0; }" > main.c
$ clang main.c -Wl,-no_adhoc_codesign -arch arm64 -arch x86_64 -o main
$ shasum main
113033b3d9a247210b49a476bbfadb2e347846fe  main
The shasum of main should always be the same regardless of your host
machine2. On Apple Silicon machines you can see this binary has the
same sha1 even if you run clang under Rosetta 23:
$ arch -x86_64 clang main.c -Wl,-no_adhoc_codesign -arch arm64 -arch x86_64 -o main
$ shasum main
113033b3d9a247210b49a476bbfadb2e347846fe  main
The issue is introduced when you codesign the binary on Apple Silicon
machines versus Intel machines. You can immediately see the
difference3:
$ codesign --force --sign - main
$ shasum main
84631e812bd480c306766ba03a728dd2565dd672  main
% arch -x86_64 codesign --force --sign - main
% shasum main
f631b6c0daf3ffd0bb5f65d19fa045acf447a72d  main
We get closer to identifying the problem when you compare the details of
these differences:
$ codesign --force --sign - main
$ codesign -dvvv main > arm.txt 2>&1
$ arch -x86_64 codesign --force --sign - main
$ codesign -dvvv main > intel.txt 2>&1
$ diff -Nur intel.txt arm.txt
There are a few fields that differ here, but, given that most of them
seem to be hashes, it felt natural to focus on the Identifier field
(especially since that appears to contain our file name).
In the manual page for codesign(1), we see some useful
information related to identifier:
-i, --identifier identifier
    During signing, explicitly specify the unique identifier string that is
    embedded in code signatures. If this option is omitted, the identifier
    is derived from either the Info.plist (if present), or the filename of
    the executable being signed, possibly modified by the --prefix option.
    It is a very bad idea to sign different programs with the same
    identifier.
This gives us further hints to what is going on. Specifically, since we
do not have an Info.plist, the logic must not be deriving the
identifier in that way. Given this information we can assume
codesign is falling back to some other value here, but it's still
not clear why it isn't reproducible across architectures.
Luckily, Apple's open source page has quite a few internal
libraries, which in this case covers our issue. Looking through the
Security project's source code4, we can immediately see
some useful information for this field:
@constant kSecCodeSignerIdentifier If present, a CFString that explicitly specifies
 the unique identifier string sealed into the code signature. If absent, the identifier
 is derived implicitly from the code being signed.
This begs the question: How is this information derived if there is no
explicit identifier? Tracing this constant through the code, we can see
it sets the mIdentifier field, which is otherwise only set through
this logic:
The prefix referenced here is from the --prefix field mentioned in the
codesign(1) man page. Since we're also not passing that we can
ignore this logic and assume the uniqueName() logic is key here (which
also explains the - we see after our filename). As we trace this logic
through the codebase, we begin to see the core issue:
//// Generate a unique string from our underlying DiskRep.// We could get 90%+ of the uniquing benefit by just generating// a random string here. Instead, we pick the (hex string encoding of)// the source rep's unique identifier blob. For universal binaries,// this is the canonical local architecture, which is a bit arbitrary.// This provides us with a consistent unique string for all architectures// of a fat binary, *and* (unlike a random string) is reproducible// for identical inputs, even upon resigning.//std::stringSecCodeSigner::Signer::uniqueName()const{CFRef<CFDataRef>identification=rep->identification();...}//// We choose the binary identifier for a Mach-O binary as follows:// - If the Mach-O headers have a UUID command, use the UUID.// - Otherwise, use the SHA-1 hash of the (entire) load commands.//CFDataRefMachORep::identification(){std::unique_ptr<MachO>macho(mainExecutableImage()->architecture());returnidentificationFor(macho.get());}CFDataRefMachORep::identificationFor(MachO*macho){// if there is a LC_UUID load command, use the UUID contained thereinif(constload_command*cmd=macho->findCommand(LC_UUID)){constuuid_command*uuidc=reinterpret_cast<constuuid_command*>(cmd);// uuidc->cmdsize should be sizeof(uuid_command), so if it is not,// something is wrong. Fail out.if(macho->flip(uuidc->cmdsize)!=sizeof(uuid_command))MacOSError::throwMe(errSecCSSignatureInvalid);charresult[4+sizeof(uuidc->uuid)];memcpy(result,"UUID",4);memcpy(result+4,uuidc->uuid,sizeof(uuidc->uuid));returnmakeCFData(result,sizeof(result));}// otherwise, use the SHA-1 hash of the entire load command area (this is way, way obsolete)...}
The gist of this logic is to fetch the UUID embedded in every binary
and use that to derive the identifier. The reason this isn't
reproducible across architectures is because the UUID is based on the
content of each binary, which differs across architectures. You can
print these UUIDs with:
$ dwarfdump -u main
UUID: 5413BC88-D3B1-3DFA-855A-7F47CF229020 (x86_64) main
UUID: E4472179-D9EC-3BFF-92FF-3F8E6D013184 (arm64) main
The fallback logic we see above relies on the contents of binary's load
commands which unfortunately also differs based on architecture.
Summary
While this was a very informative deep dive into this logic, if you rely
on reproducible binaries and want to support Apple Silicon machines, you
need to do 2 things for binaries without Info.plist files:
Don't allow the linker to automatically sign your binaries by passing
-no_adhoc_codesign
Pass an explicit identifier when linking binaries with --identifier
to the codesign invocation
I filed a radar about this behavior: FB9681559 (Make codesign for fat
binaries reproducible across architectures).
Updates
After working around this codesign issue it was noted that the same
issue with random binary names also affects the UUID computation. To
workaround this you can pass -Wl,-no_uuid but note this has a
negative impact on LLDB attach times for binaries if you need to debug
them.
I landed a fix in
clang
to make these temporary binary names reproducible. It will hopefully
be part of a future version of Apple's clang fork.
This behavior can be disabled by passing -no_adhoc_codesign to
link invocations. With OTHER_LDFLAGS in Xcode you need to pass
-Wl,-no_adhoc_codesign since link invocations go through
clang, not directly to ld↩
As long as you're using the same version of clang. This example
was built with Xcode 13.0 13A233 ↩
Luckily if you run this on an Intel machine, instead of through
arch's Intel emulation, you'll get the same results ↩↩2
]]>
<![CDATA[Switching Xcode versions without a password]]>http://smileykeith.com/2021/08/12/xcode-select-sudoers2021-08-12T13:40:00-07:00
When switching between multiple Xcode versions one way to globally
update the version you want to use is by running
xcode-select like this:
Then, if you want to automatically accept Xcode's license, and install
any extra packages it requires (which should only be required the for
the first time you run a new version), you can run:
sudo xcodebuild -runFirstLaunch
This works fine locally, but when updating remote CI machines, entering
the password can be troublesome. Furthermore if you want to support
having CI machines automatically switch between Xcode versions when
testing upcoming changes, you may not have the opportunity to be
prompted at all. Lucky for us, the sudoers file format,
which configures the sudo command, allows us to skip password entry
for specific commands with a bit of configuration.
The easiest way to edit this configuration is by running:
sudo visudo
This opens the default /etc/sudoers configuration file in vim. While
we could add our custom configuration here, we can also see the default
configuration that ships with macOS contains this line:
#includedir /private/etc/sudoers.d
This tells sudo to load all the files in /etc/sudoers.d1 as
configuration as well. Using this knowledge we can nicely separate our
custom configuration, making it easier to overwrite, or remove, in the
future. Separating our custom configuration also makes us less likely to
break the default configuration, potentially leading to major issues.
To setup our custom configuration we can run this command:
echo"%admin ALL=NOPASSWD: /usr/bin/xcode-select,/usr/bin/xcodebuild -runFirstLaunch" | sudo tee /etc/sudoers.d/xcode
Let's break this down2. The %admin component makes this
configuration apply to all users that are in the admin group3.
Using this group is probably good enough for this use case, but if you'd
like to restrict this more, you can change this to a your account's
specific username such as ksmiley.
The second component ALL makes this rule apply to all hosts, I'm not
sure in what context any host besides the current one would take these
rules into account, but ALL ignores that.
The third component NOPASSWD is the key piece of this functionality.
This enables us to run the following commands without being prompted for
our password.
The last component is the commands we want to allow to be run without a
password. There are 2 things to note here.
We specify just the xcode-select binary, using the absolute path.
This allows all subcommands handled by xcode-select to be run
without a password.
The xcodebuild command also contains the one subcommand we want to
be able to run without a password. Limiting this is important because
otherwise you could run sudo xcodebuild build without a password,
which could execute malicious run scripts or do other terrible
things. With this argument specified any other invocation of sudo
xcodebuild will still require a password.
Just like that we no longer have to enter our password when swapping
between Xcode versions.
/etc is actually a symlink to /private/etc, which is why we
can use them interchangeably in this case ↩
For many more format examples checkout the man page↩
You can see what groups the current user is in by running
groups, but for macOS all administrator accounts are part of
this group. ↩
]]>
<![CDATA[Locking Xcode versions in bazel]]>http://smileykeith.com/2021/03/08/locking-xcode-in-bazel2021-03-08T08:40:00-08:00
When using bazel on a team, one of the
things you quickly want to do is stand up a remote
cache.
This allows bazel to download build artifacts instead of spending CPU
cycles reproducing things that have already been built by someone else.
In order for bazel to guarantee that downloading the artifacts instead
of building them will produce the same results, it must ensure that all
the inputs of your build are the same as a previous build.1 For macOS
and iOS builds bazel's inputs include the version of Xcode you're using.
This means if developers on your team use different versions of Xcode,
they cannot share the same build cache.
Bazel discovers your currently installed Xcode versions by running
xcode_locator,
and then
generating
a BUILD file that contains an entry for every version you currently
have installed. The result looks something like this:2
In order to enforce developers use the same version, you can short
circuit bazel's Xcode discovery and instead reference a local
target
that you provide.3
To do this, you can setup your target in the BUILD file at the root of
your project (or somewhere else if you'd prefer). Using the contents
from the example above, but only including the Xcode versions you want
to support, it will contain:
This way if a developer tries to build with a version of Xcode that is
not explicitly supported, they see this error:
ERROR: /.../BUILD.bazel:31:11: Compiling something failed: I/O exception during sandboxed execution: Running '/.../xcode-locator 12.4.0.12D4e' failed with code 1.
This most likely indicates that xcode version 12.4.0.12D4e is not available on the host machine.
This is a simple solution if you only want to support a single version
of Xcode at once. Often it's useful to support multiple Xcode versions
for testing, even if not all versions will get cache hits. In this
case, one solution is to include multiple versions in your BUILD
file:
Which is very similar to our first example, except we replaced the
aliases with the build numbers from each version. This is a perfect
unique value to differentiate between multiple versions during the Xcode
beta cycle. Now we can explicitly pass the
xcode_version
argument with the build number you want to use. You can retrieve the
build number from your current Xcode version like this:
Using this method you can support multiple versions of Xcode, while
still respecting the user's xcode-select value (or DEVELOPER_DIR
environment variable).
Debugging remote cache misses is something you'll need to get used
to doing. This documentation
is very helpful. ↩
This example doesn't include the remote execution configuration,
but it works similarity ↩
This also improves repository setup time. Otherwise it increases
with the number of Xcode versions you have installed. ↩
]]>
<![CDATA[Supporting relative paths: XCTest failures in Xcode]]>http://smileykeith.com/2021/03/04/supporting-relative-paths2021-03-04T20:48:00-08:00
If you build your iOS app with an alternate build system such as
bazel, it's likely that you use relative
paths, instead of absolute paths, for compilation.
Specifically, when building swift code, Xcode calls the compiler with
something like:
Normally, this difference is inconsequential, both compilations will
result in a similar enough output. So, the question is: Why would you
pick one over the other? For bazel, the answer lies in its core feature
of "hermeticity". In bazel's case, being hermetic means that given the
same inputs you always produce the same outputs. This means that
regardless of what machine you're building on, or what directory your
source is cloned in, the results should be the same. Because, those
details aren't considered important inputs in the build.
Unfortunately, in a few places, Xcode relies on paths being absolute.
Today, we'll look at how Xcode reports test failures in the UI.
Specifically the underlying
XCTIssue
that XCTest creates is expected to be instantiated with an absolute
path. This absolute path is populated from the #filePath (previously
#file) keyword which is supposed to reference the absolute path of
the current source file.
The first question is: How does the Swift compiler know what the
absolute path of the current file is? It's easy when Xcode passes an
absolute path to the compiler. But, what if you pass a relative path? In
this case, the Swift compiler uses the directory passed with the
-working-directory argument to make the path absolute. It turns out if
you don't pass this argument, the compiler has no choice but to use the
relative path. This means the #filePath keyword ends up translating to
a relative path, which means the XCTIssue is created with a relative
path.
With relative paths when you run your tests in Xcode and they
fail, clicking the failure in the issue navigator doesn't do anything.
But, it's supposed to jump you to the test case that failed (FB8451256,
FB8454623).
So, how do we fix this? Luckily, we know the core issue is XCTIssue is
created with a relative path. Since XCTIssue instances are created as
part of our process, we can
swizzle it to fix this.
Looking at the underlying XCTSourceCodeLocation
docs,
we can see there are 2 initializers we're potentially interested in.
Setting some quick breakpoints we can see that XCTIssue goes through
the init(fileURL:lineNumber:) initializer. When we inspect the
argument it receives in the debugger, we can see it's the relative path
we passed to the compiler. Knowing this, we can surmise that by
swizzling the initializer, and make the argument an absolute path, we
can satisfy Xcode's requirement. So, what path do we use? Using Xcode's
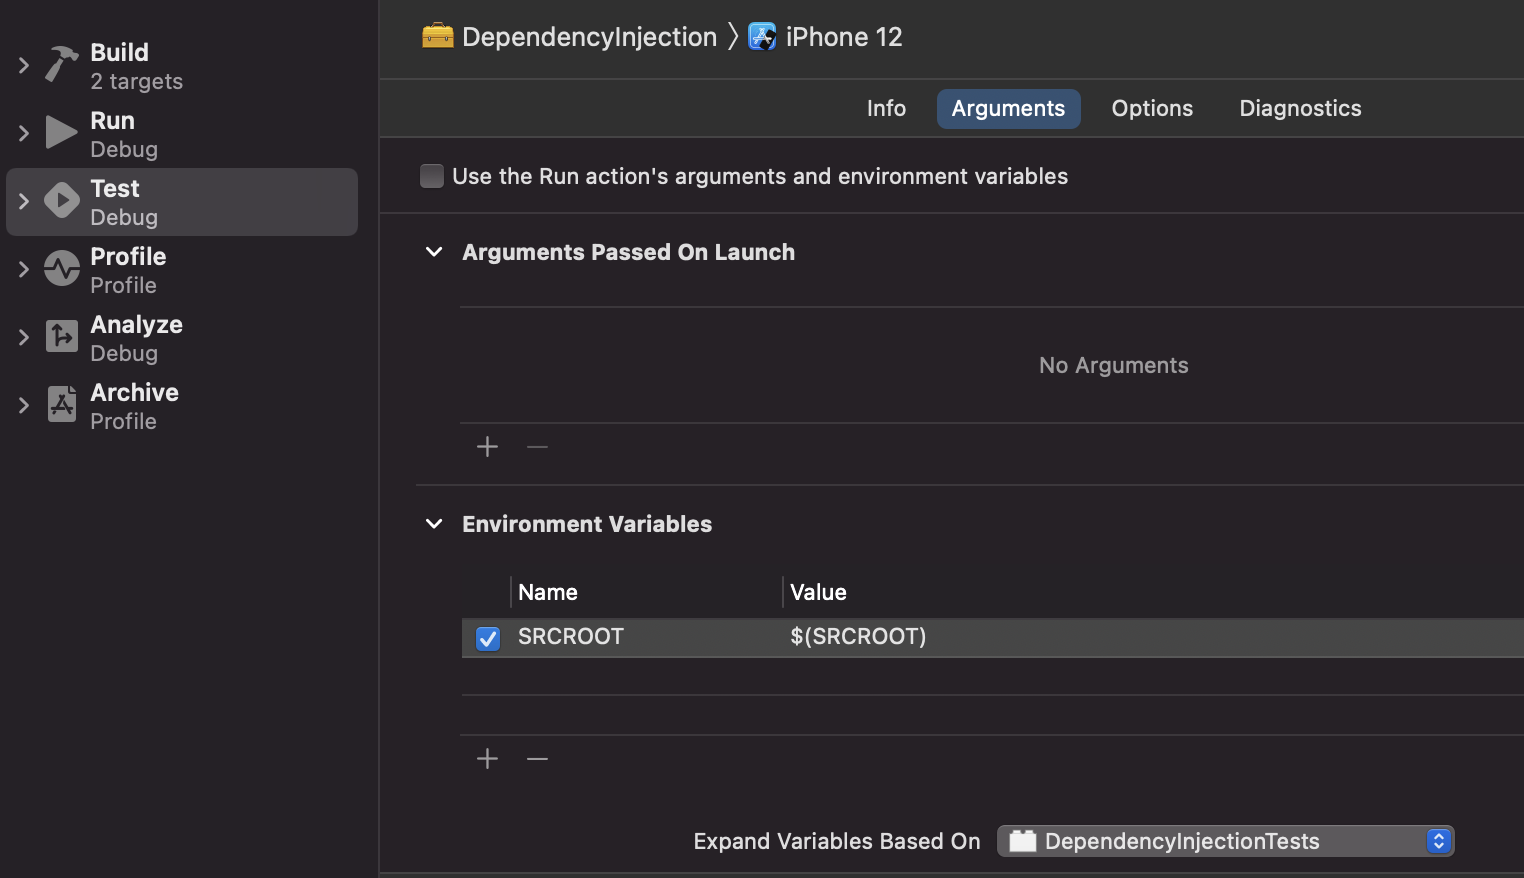
scheme environment variables, we can pass Xcode's SRCROOT through an
environment variable named the same thing:
Make sure to have the "Expand Variables Based On" dropdown set to some
target (FB8454879) or the $(SRCROOT) string will be passed through
literally.
Now, for the swizzling:
importFoundationimportXCTest// NOTE: This path has to start with a / for fileURLWithPath to resolve it correctly as an absolute pathpublicletkSourceRoot=ProcessInfo.processInfo.environment["SRCROOT"]!privatefuncremapFileURL(_fileURL:URL)->URL{iffileURL.path.hasPrefix(kSourceRoot){returnfileURL}returnURL(fileURLWithPath:"\(kSourceRoot)/\(fileURL.relativePath)")}privateextensionXCTSourceCodeLocation{@objcconvenienceinit(initWithRelativeFileURLrelativeURL:URL,lineNumber:Int){// NOTE: This call is not recursive because of swizzlingself.init(initWithRelativeFileURL:remapFileURL(relativeURL),lineNumber:lineNumber)}}funcswizzleXCTSourceCodeLocationIfNeeded(){// NOTE: Make sure our "Expand Variables Based On" is set correctlyifkSourceRoot=="$(SRCROOT)"{fatalError("Got unsubstituted SRCROOT")}letoriginalSelector=#selector(XCTSourceCodeLocation.init(fileURL:lineNumber:))letswizzledSelector=#selector(XCTSourceCodeLocation.init(initWithRelativeFileURL:lineNumber:))guardletoriginalMethod=class_getInstanceMethod(XCTSourceCodeLocation.self,originalSelector),letswizzledMethod=class_getInstanceMethod(XCTSourceCodeLocation.self,swizzledSelector)else{fatalError("Failed to swizzle XCTSourceCodeLocation")}method_exchangeImplementations(originalMethod,swizzledMethod)}
With this implementation, you need to call
swizzleXCTSourceCodeLocationIfNeeded() somewhere. Using the
NSPrincipalClass plist
key,
we can define a class that is initialized as soon as your test bundle
starts to run. This key must be set in your test bundle's plist, not any
host apps you are using for the test bundle. For bazel this means on the
infoplists key of your ios_unit_test rule. We can define a small
class to call our swizzling code:
Disclaimer: this relies on a lot of implementation details in Xcode
which might break in the future. You should avoid this if possible.
]]>
<![CDATA[Editing rpaths for _InternalSwiftSyntaxParser]]>http://smileykeith.com/2021/03/03/editing-rpaths2021-03-03T19:48:00-08:00
One of the issues with shipping a tool that depends on
SwiftSyntax is that it depends
on a dynamic library that is provided with Xcode called
_InternalSwiftSyntaxParser. This library provides some of Swift's
logic for how to parse Swift code. When you run a command line tool that
was built with a different version of Xcode than what you have installed
locally, you hit this issue:
<unknown>:0:0: error: The loaded '_InternalSwiftSyntaxParser' library is from a toolchain that is not compatible with this version of SwiftSyntax
Ideally, this library would be statically linked to your executable (and
I'm hoping we can find a
solution to this) so you
would no longer have to worry about this. In the meantime, we can work
around this issue by shipping the version of the library from Xcode
alongside your executable, and loading that instead. This will increase
your distribution archive's size, but make it easier to support multiple
versions of Xcode at once.
The key to this workaround relies on how
dyld works.
dyld is responsible for loading the dynamic libraries your binary
depends on. First, it's useful for you to see what libraries you depend
on with
otool.
For example:
% otool -L ./.build/debug/drstring-cli
./.build/debug/drstring-cli:
  ...
  /usr/lib/swift/libswiftObjectiveC.dylib (compatibility version 1.0.0, current version 1.0.0, weak)
  /usr/lib/swift/libswiftXPC.dylib (compatibility version 1.0.0, current version 1.1.0, weak)
  @rpath/lib_InternalSwiftSyntaxParser.dylib (compatibility version 1.0.0, current version 17013.0.0)
Here you can see many libraries are directly referenced with their
absolute paths while lib_InternalSwiftSyntaxParser.dylib, the library
we're specifically interested in, is referenced via a
rpath. You can run this command
to see your binary's rpaths (yours may differ depending on your
absolute path to Xcode):
Here we can see that dyld is instructed to look in 2 directories to
find lib_InternalSwiftSyntaxParser.dylib. First, it looks in the
directory specified by @loader_path, which in our case is likely
irrelevant since it is the directory that contains our executable. Then,
it looks inside a directory within my absolute path to Xcode (which
isn't very portable), which we can see this includes the library we
expect (you'll have to change this path to your local Xcode path):
Given this information, our goal is to replace the default locations
dyld searches, and replace those with the directory we want. There are
a few ways we can do this, but first we need to decide what directory we
will ship the library in. Typically, the directory structure for a
command line tool that includes a dynamic library looks something
like this:
<prefix>
├── bin
│   └── drstring-cli
└── lib
    └── lib_InternalSwiftSyntaxParser.dylib
We can use this for our example. First, we need to copy the library
from Xcode using (this might change with future Xcode releases):
Then, using
install_name_tool,
we can edit the rpaths in our binary. In this case, since we only have
2 rpaths, and neither of them are what we want, lets delete them both
(you'll have to change the Xcode path for your local installation):
Now, when we run our binary, we see it crashes immediately because it
cannot find the libraries it needs:
% bin/drstring-cli
dyld: Library not loaded: @rpath/lib_InternalSwiftSyntaxParser.dylib
  Referenced from: /Users/ksmiley/dev/DrString/bin/drstring-cli
  Reason: image not found
At this point we have 2 options. We can either launch our binary with
some special environment variables that dyld reads, or encode the
rpath we want into the binary. Since adding the rpath to the binary
is destructive, lets try the environment variable approach first as an
example. Using DYLD_LIBRARY_PATH we can instruct dyld to discover
the libraries we want:
% DYLD_LIBRARY_PATH=lib bin/drstring-cli
OVERVIEW: A Swift docstring linter, formatter, nitpicky assistant...
...
There is also DYLD_FALLBACK_LIBRARY_PATH, which unlike
DYLD_LIBRARY_PATH, has a default of /usr/local/lib:/usr/lib. This
means if your library doesn't exist in the binary's rpaths, but then
happens to be in /usr/local/lib, it will still run as expected. This
is useful to know, because homebrew installs
libraries to /usr/local/lib on Intel based Macs. This can be
surprising if you install an unrelated tool that depends on the same
library and then your binary discovers this unrelated installation when
you don't want it to. If you want to disable this fallback, you can set
the value to /dev/null. In our example, using
DYLD_FALLBACK_LIBRARY_PATH results in same behavior:
% DYLD_FALLBACK_LIBRARY_PATH=lib bin/drstring-cli
OVERVIEW: A Swift docstring linter, formatter, nitpicky assistant...
...
Instead of setting environment variables every time we run the binary,
we can edit our binary to instruct dyld to search the correct
directory. Again, we use install_name_tool for this:
In this case we rely on a relative path, based on the executable's
current path, to find our library. Now, as long as we ship the library
alongside our binary, we can run it without setting any environment
variables.
To check that this worked as expected you can launch your executable
with DYLD_PRINT_LIBRARIES set and grep for the library:
To use this method with Swift Package Manager you'll have to run a
post-processing script that alters your rpaths using what we've
learned.
Overall this is more work than if we could produce a statically linked
binary, but it's better than having to force your users on to a specific
version of Xcode.
]]>
<![CDATA[Cross compiling for Apple Silicon with Swift Package Manager]]>http://smileykeith.com/2020/12/24/swiftpm-cross-compile2020-12-24T14:32:00-08:00
If you distribute binaries for command line tools built with Swift
Package Manager, you might have
previously built your distribution binary with:
% swift build --configuration release
If you inspect the binary, you can see it was built for the current
machine's architecture by default:
Previously, this was sufficient since macOS only supported one
architecture. Now, in order to fully utilize the native performance of
Apple Silicon chips, we need to produce a fat
binary that contains a slice
for both x86_64 and arm64.
Swift Package Manager has a few different ways to achieve this. The
easiest way, as far as I can tell, is to pass the hidden --arch flag
once for each architecture:
% swift build --configuration release --arch arm64 --arch x86_64
This goes through a different code
path
in Swift Package Manager, and utilizes Xcode's underlying XCBuild tool.
This results in the built binary being in a different path than usual.
Inspecting the new artifact, we can see we have a binary containing both
requested architectures:
Another option is to build once for each architecture, and then combine
the binaries using
lipo. Unlike
the --arch option, this approach also works on Linux. Here's an
example:
% swift build --configuration release --triple arm64-apple-macosx
% swift build --configuration release --triple x86_64-apple-macosx
% lipo -create-output package .build/arm64-apple-macosx/release/package .build/x86_64-apple-macosx/release/package
Inspecting our final binary we can see it correctly has both
architectures:
]]>
<![CDATA[LLDB Reproducers]]>http://smileykeith.com/2020/09/29/lldb-reproducers2020-09-29T19:39:00-07:00
Swift developers love to complain about LLDB. While there are many
reasonable complaints, the important question is what can we do to make
it better.
Enter reproducers. Reproducers provide a way to run LLDB
while also capturing information about your debugging session. With this
information you can submit a more useful bug report to Apple
with a reliable reproduction case.
How?
Although the steps to use reproducers are mostly straightforward,
launching LLDB from Xcode does not enable --capture mode (FB7878562).
This means if you want to provide a reproducer for an issue you've
experienced in a Xcode debugging session, you need to reproduce it
outside of Xcode instead.
Update: the folks from PSPDFKit pointed
out as
of Xcode 12 there is a private default for enabling capture mode for
debugging sessions launched from Xcode:
Note: to provide enough information to reproduce your issue, LLDB
bundles all files the debugging session touched. This includes binaries
with debug info that you may consider sensitive. As pointed out on
Twitter
this will also contain anything in memory at the time of capture. Be
sure to verify what you're sharing with Apple before you send
it.
CLI / macOS app
If you're debugging a program on your Mac, there are a few steps:
Run the app in Xcode and stop it. This way you know the binary is up
to date.
In Terminal.app navigate to your DerivedData directory (you can find
this by right clicking on your app in the "Products" section of
Xcode's project navigator, and clicking "Show in Finder").
Run lldb --capture /path/to/Your.app.
In the LLDB session run process launch --stop-at-entry.
Now you're in a paused LLDB session. Here you can set the
breakpoints you need to reproduce your issue. Often for
me this means breaking at a specific place, and running some version
of po foo that causes an issue.
Once you're done reproducing the issue, run reproducer generate in
LLDB. This will print the path the information was written to.
Verify the contents of the output directory doesn't include anything
you're not comfortable sharing with Apple, zip it, and submit a
radar!
iOS app on the simulator
Running apps directly from LLDB on the iOS simulator does not
work
the same way as running a macOS app. Because of this, the steps differ.
Run the app in Xcode and stop it. This way it's updated and installed
on the iOS simulator.
Run lldb --capture --wait-for --attach-name YOUR_APP_NAME.
Manually launch your app in the Simulator.
Now you're in a paused LLDB session. Here you can set the
breakpoints you need to reproduce your issue. Often for
me this means breaking at a specific place, and running some version
of po foo that causes an issue.
Once you're done reproducing the issue, run reproducer generate in
LLDB. This will print the path the information was written to.
Verify the contents of the output directory doesn't include anything
you're not comfortable sharing with Apple, zip it, and submit a
radar!
iOS app on device
Unfortunately, I haven't yet figured out the right incantation to launch
LLDB directly and attach to an on-device process. If anyone has a good
workflow for this please let me know.
Try out lldb --replay /path/to/your/reproducer to see what Apple
will see.
You can attach to XCTest processes by using xctest as your
--attach-name argument.
]]>
<![CDATA[NSProgress with Asynchronous Tasks]]>http://smileykeith.com/2015/03/14/nsprogress-with-asynchronous-tasks2015-03-14T18:57:00-07:00
After having a use for NSProgress I finally got a chance to dive in to
its API. I found it to be less than understandable. So I wrote about it
on the thoughtbot blog. You can find my post, NSProgress with
Asynchronous Tasks,
here.
]]>
<![CDATA[ReactiveCocoa and Core Data]]>http://smileykeith.com/2015/03/14/reactive-cocoa-and-core-data2015-03-14T18:53:00-07:00
After finally starting to use
ReactiveCocoa I found
integrating with Core Data to be a sore spot. I wrote about improving this
integration on the thoughtbot blog
here.
]]>
<![CDATA[Writing Vim Syntax Plugins]]>http://smileykeith.com/2015/03/14/writing-vim-syntax-plugins2015-03-14T18:48:00-07:00
After writing about
Clojure I wrote about
writing Vim syntax plugins. Check it out
here.
]]>
<![CDATA[Clojure]]>http://smileykeith.com/2015/03/14/clojure2015-03-14T18:27:00-07:00
I haven't had anything to write in a while. Mainly because, as I've been
working at thoughtbot, I've been writing
everything I can on the thoughtbot
blog. I spent a little while writing
Clojure, and out of that came a few posts.
Overall I wasn't a big fan of Clojure. I definitely lean more towards
functional languages with types but I wanted
to link these articles here regardless.
]]>
<![CDATA[Vim TagBar with Objective-C]]>http://smileykeith.com/2014/02/14/vim-tagbar-with-objective-c2014-02-14T13:53:00-08:00
When working with large files in Vim,
Tagbar has become an invaluable
part of my workflow. It provides a succinct list of methods, modules,
variables and other language specific constructs. When I started trying
to spend more time in Vim writing Objective-C I was disappointed to see
that, out of the box, it was not supported.
Hopefully in the future it won't be difficult to set this up in Vim.
Currently ctags already
has built in support
for Objective-C. Unfortunately there hasn't been a release of ctags
since 2009. As recommended in the canonical how to
article
you can attempt to use the trunk version of ctags and just define the
Tagbar settings. For me, this ended up producing a ton of
mis-categorized duplicates. I also opened and closed an
issue on the Tagbar
Github repo hoping that Objective-C support will be added by default in
the future.
The only other resource I could find about this issue was this
gist. It uses regex to define
Objective-C to ctags and then match it with Tagbar. I improved it a
little bit and came up with this. Put this file anywhere you want, you
will define its path in your vimrc.
Replace the ~/.vim/objctags with the path where you chose to put the
first file. Please let me know if you see any way that this could be
improved.
]]>
<![CDATA[IPSEC/L2TP VPN on a Raspberry Pi running Arch Linux]]>http://smileykeith.com/2014/01/27/ipsec-l2tp-vpn-on-a-raspberry-pi-running-arch-linux2014-01-27T20:49:00-08:00
After you buy a Raspberry Pi, or two, you need to figure out what to use them
for. While you'll get a ton of interesting ideas from Googling "uses for a
Raspberry Pi," I didn't particularly find them any more than a thought
exercise.
Making a VPN stood out as an actually useful configuration.
Originally when I got my (accidentally chosen) Model A, I spent a little
while going through this
guide
using Raspbian. That seemed to work fine until I recently purchased a
Model B to replace it and couldn't reproduce the configuration. I
decided to write the steps that I was finally able to use to get a
functional VPN running on Arch Linux.
I started out by following this
guide
hoping that it would get me a functioning VPN without too much work. Most of
this setup will be based on that article with some tweaks for what I had to do
to make the settings stick. Unfortunately while it worked after the setup the
configuration did not persist after restart. For this configuration, like I
said earlier, I wanted to use the ARM version of Arch Linux rather than
Raspbian for the install. You can download the Raspberry Pi compatible Arch
image from their downloads page. I'm
not sure I would recommend Arch for people who haven't installed it before or
at least gotten through their Beginners'
Guide. The ARM Image,
like the normal image, doesn't come with a GUI, perfect for this use of the Pi.
I'm not going to bother with making sure this works before restarting, since
that doesn't seem like much of an issue with actual usage (although you can
just run the scripts we create and it should work fine). I wouldn't recommend
doing much configuration before doing this intial setup. I did this the first
time and after an hour of configuration my VPN did not work correctly, I ended
up nuking the work I had done and starting over.
Start by installing the necessary components:
pacman -Sy openswan xl2tpd ppp lsof python2
You need to do some configuration of the firewall and redirects:
To make these settings persist we need to create a script that gets launched by
systemd each time we restart the system. As recommended in the original
article, and being a Homebrew user I created the script in
/usr/local/bin/vpn-boot.sh:
#!/usr/bin/bash
iptables --table nat --append POSTROUTING --jump MASQUERADE
for vpn in /proc/sys/net/ipv4/conf/*;do
echo 0 >$vpn/accept_redirects;echo 0 >$vpn/send_redirects;done
sysctl -p
There are a few things that differ here to the original article. First
the hashbang path was changed since the default $PATH on the ARM version
of Arch didn't include /bin. I would run which -a bash on your
install to make sure this works for you. This obviously doesn't have
to be changed, but I think it's better in the long run. I also added
sysctl -p since these settings didn't seemed to be applied otherwise.
Then you must make this script executable with something like:
chmod +x /usr/local/bin/vpn-boot.sh
Since Arch uses systemd to this script has to be launched by creating a
service to be ran through systemd. You can create this file in
/etc/systemd/system/vpnboot.service
I added a few things here as well. I wanted to make sure that the boot command
would launch after the network settings had been established and before the
other VPN software was launched. I'm not sure how many of these changes would
be required for systemd to do what I wanted it to but the order really seemed
to matter for here. After you create this service enable it within systemd
with:
systemctl enable vpnboot.service
I also made some changes to /etc/ipsec.conf (note the comments in the
default file for some more info on these settings):
config setup
  dumpdir=/var/run/pluto/
  nat_traversal=yes
  virtual_private=%v4:10.0.0.0/8,%v4:192.168.0.0/16,%v4:172.16.0.0/12,%v4:25.0.0.0/8,%v6:fd00::/8,%v6:fe80::/10
  oe=off
  protostack=netkey
  plutoopts="--interface=eth0"

conn L2TP-PSK-noNAT
  authby=secret
  pfs=no
  auto=add
  keyingtries=3
  ikelifetime=8h
  keylife=1h
  type=transport
  # Your server's IP (I used my internal IP, assuming you're using NAT)
  left=172.16.1.1
  leftprotoport=17/1701
  right=%any
  rightprotoport=17/%any
  rightsubnetwithin=0.0.0.0/0
  dpddelay=10
  dpdtimeout=20
  dpdaction=clear
Then for the /etc/ipsec.secrets (use the same server IP address):
%SameIP% %any: PSK "super random key"
The make systemd start openswan on boot as well:
systemctl enable openswan
I also edited the openswan service file in
/etc/systemd/system/multi-user.target.wants/openswan.service
As you can see I removed the original network dependency and added a new
dependency of netctl's
default network interface (we haven't enabled this yet).
Next for /etc/xl2tpd/xl2tpd.conf:
[global]
ipsec saref = yes
saref refinfo = 30

[lns default]
ip range = 172.16.1.70-172.16.1.89
local ip = 172.16.1.1
require authentication = yes
ppp debug = yes
pppoptfile = /etc/ppp/options.xl2tpd
length bit = yes
unix authentication = yes
Where local ip is the server's ip and the ip range is the range of
IP addresses you want to use for VPN clients. You need to enable this
service too with:
systemctl enable xl2tpd
I also edited the systemd file for xl2tpd at
/etc/systemd/system/multi-user.target.wants/xl2tpd.service:
If you'd like you can also restrict the users accounts that can access
the vpn. This way you can separate your login user from your VPN users
who can have much stronger passwords. You'd do that in your
/etc/ppp/pap-secrets:
vpnuser l2tpd "" *
To enable the startup of the default netctl eth0 interface you need to
run:
netctl enable eth0
You'll probably want to disable any other netctl systemd functions that are
enabled by default. Check /etc/systemd/system/mutli-user.target.wants to for
other netctl profiles.
So at this point you should be able to enable VPN clients using the
super secret keys you enabled before and the username and passwords
you've created previously. You can create new users for specifically VPN
usage with something like this:
useradd -s /sbin/nologin vpnuser
This disallows users from being able to be used for login which is probably
more secure for your VPN (although not required). For testing you can use the
root/root defualt user and a less secure key, although you should definitely
change these before allowing access to the outside world.
Troubleshooting
Undoubtedly you'll have to deal with something that doesn't work exactly
how my setup works. The most useful things to seeing what was happening
were these:
netstat -tulpan
systemctl status openswan
systemctl status xl2tpd
journalctl -f
You can glance at some of the other guides to see what should be going
on. You probably shouldn't see any red in the openswan status and you
should see ports open under pluto with netstat. You can check out the
ipsec manpage or the openswan
wiki
page
for a little more information on some of the settings. Also I used this
page
for some more info on how systemd settings work. Please let me know if
there's anything here that could be done easier/better for this
configuration.
]]>
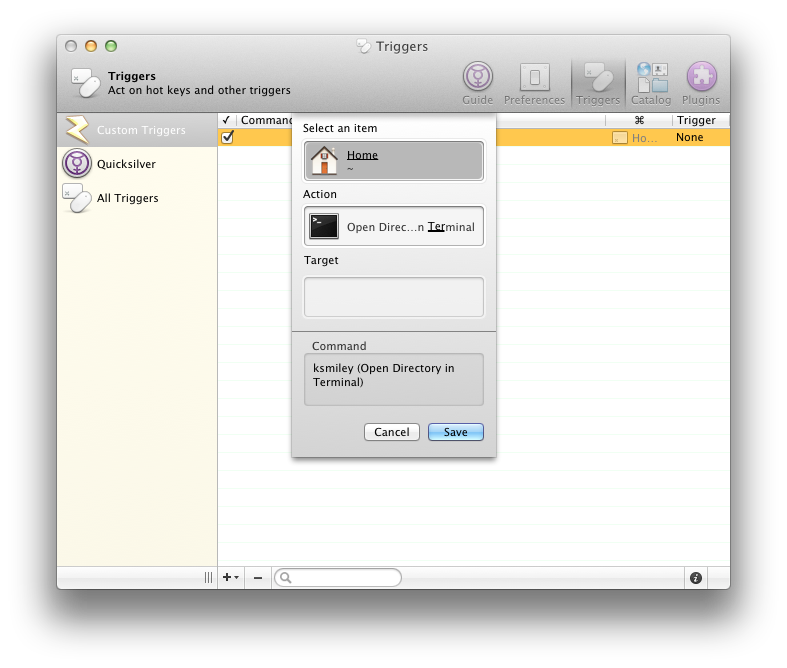
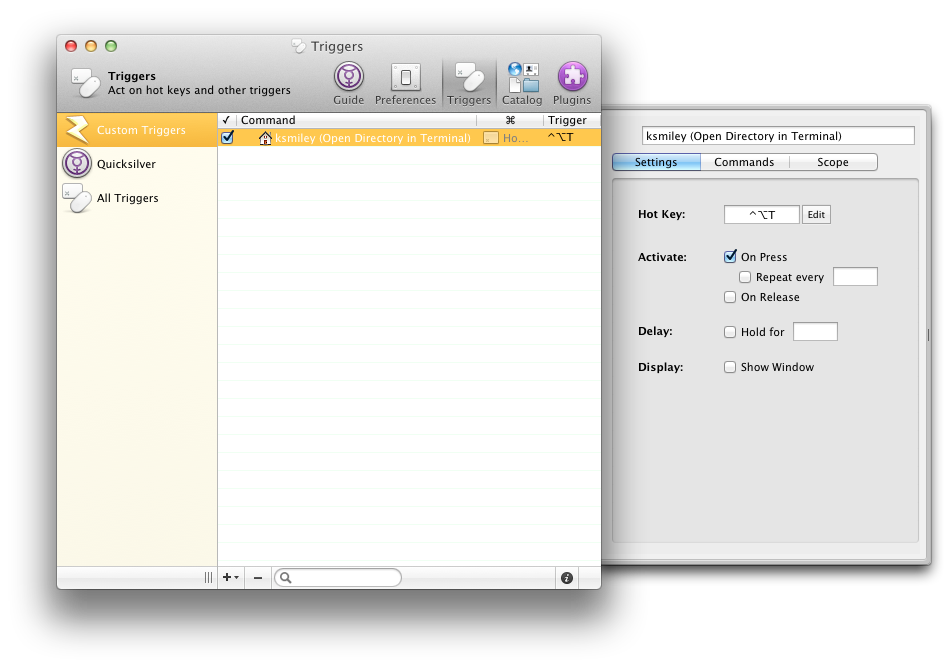
<![CDATA[iTerm theme based on the time of day]]>http://smileykeith.com/2013/09/03/iterm-theme-based-on-the-time-of-day2013-09-03T10:56:00-07:00
One of the great things about Vim's textual configuration is it's
ability to contain logic based on outside factors. For the purpose of
this post I'm referring to the ability to set your colorscheme based on
the time of day with something like
this.
Having this functionality in Vim with the
Solarized theme at night really
made me want this in iTerm as
well. Unfortunately iTerm's conifguration doesn't allow anything similar
to this. The closest you get is profiles which you can assign keyboard
shortcuts to for quickly opening windows with different colorschemes.
Luckily, thanks to this pull
request two years ago from
Piet Jaspers, support was added for
scripting iTerm's entire colorscheme with AppleScript. Using these
AppleScript bindings I was able to create a
script
that changes the entire colorscheme of iTerm based on the time of day
between Solarized light and dark. As you can see the
bulk
of this script is just setting different color attributes based on the
theme you want. While you could do this conversion by hand to 65535
flavored RGB, I made a
tiny Objective-C app to automate the process which is on
Github. You can download
the signed binary
here.
Using this newly created AppleScript I then made a zsh
function so that I could call colorize from anywhere to update the color scheme of the current terminal.
I also chose to do this at the end of my .zshrchere.
This way everytime I open a new session my theme is automatically set.
If you have any input on how I could optimize this let me know.
]]>
<![CDATA[Global htaccess]]>http://smileykeith.com/2013/08/14/global-htaccess2013-08-14T13:12:00-07:00
When starting a new web project one of the first things I do is download
the most up to date HTML5 Boilerplate.
It provides a great starting point for the HTML you need in a project.
It also comes with an extremely complete .htaccess
file. While this is very nice for a single site they recommend you do
something different for multiple sites at the very top.
(!) Using .htaccess files slows down Apache, therefore, if you have access
to the main server config file (usually called httpd.conf), you should add
this logic there: http://httpd.apache.org/docs/current/howto/htaccess.html.
This got me to their awesome collection of server configs
which has their, and in many ways the communities, recommended settings
depending on your webserver. The apache configs
have the same .htaccess file so I decided to dig into how to do this.
They direct you to the apache article
about using .htaccess files which has a similar comment about their
use.
You should avoid using .htaccess files completely if you have access to httpd main server config file
Using .htaccess files slows down your Apache http server. Any directive that you can include in a
.htaccess file is better set in a Directory block, as it will have the same effect with better performance.
So I decided to set this up on my Linode VPS which is running Ubuntu 10.04.
As stated in the original file comment they recommend using the
httpd.conf file for your custom configuration like this. But
apparently that file could be
overwritten on updates of Apache which would be pretty annoying. Luckily
the default Apache config file (apache2.conf on 10.04) includes the
contents of the conf.d folder which is in the same location. By
creating a foo.conf file in that directory Apache should immediately
load its contents. As mentioned in the comment from the Apache site the
custom configuration needs to be wrapped in a Directory block.
The block expects you to provide a path to the files you want to be
affected by the contained configuration. Since I wanted this to work for
all the sites being served by Apache I simply used /srv/www/*/ which
includes my entire sites directory.
Besides the speed increased gained by using a global .htaccess file
this allows you to have much shorter custom files for site specific
configuration. For example only required configuration for one of my sites
was the ErrorDocuments. Now my .htaccess file went from 300+ lines
to
]]>
<![CDATA[OS X Crash Report Symbolication]]>http://smileykeith.com/2013/08/09/os-x-crash-symbolication2013-08-09T13:26:00-07:00
As you may know I write a small OS X called Sail. Over
the past few months that it has been available I've received a few crash reports
about an issue I wasn't able to reproduce. Today I decided I wanted to dive into
them and see if I could at least figure out the root of the issue and fix it
with my next release.
This lead me down the rabbit hole of
symbolication, something I personally
hadn't dealt with myself before (since Crashlytics does it for you). I was
hoping I would be able to find something around the internet about this,
unfortunately what I mostly came up with was a lot of iOS related answers that
didn't seem to work the same way and
twolinks to
Apple documentation that have been removed. Other than the process for
symbolicating reports for OS X apps seems to be different than iOS apps which
there is plenty of documentation for (I'm not bitter). Daniel Jalkut has a
post about these but his
exact method didn't seem to work for me.
Here is what did work for me. For my first abridged crash report I had this
Just glancing at this crash report it's not too difficult to understand a bit
about what was going on. A notification was sent, some methods were called in my
application and then accountTypeWithAccountTypeIdentifier was called. Based on
the small number of times I call that method I was quickly able to assume where
the issue was but I still wanted to see exactly what methods of mine were being
called first.
This brings me to atos the command line tool Apple provides to symbolicate
these reports. This is where my experience differs with most of what I found
online. My usage looked like this:
This uses my dSYM file that was generated with the archive build I submitted to
the app store along with the knowledge that it was running on an x86_64
architecture and the most important part, for me, the load address.
To find my dSYM file that was generated when I did my archive build I simply
noted the version and build number from the crash report, went to the Archives
tab in the Xcode organizer, found the build with the same number, right clicked
and clicked "Show in Finder." This takes you directly to the .xcarchive file
on disk which you can right click and click "Show Package Contents." From there
I copied my dSYM to the desktop so I didn't overwrite anything unintentionally.
The load address is the starting memory address of your application. The tool
uses this address as an offset to find the correct methods in your symbols. In
the above crash report Load Address is a provided field. This was the only
report I saw that had that, typically I needed to look under the Binary Images
section for the address range of my application. In this example it was
0x106823000 - 0x106896fff.
The atos command then provides an interactive prompt where you can paste
addresses into the stdin and it will tell you the corresponding methods. Mine
looked like this:
0x00000001068308f7
-[KSAccountsPreferences dealloc] (in Sail) (KSAccountsPreferences.m:77)
0x0000000106830798
-[KSAccountsPreferences viewDidLoad] (in Sail) (KSAccountsPreferences.m:73)
0x0000000106825249
-[KSAppDelegate openAboutWindow:] (in Sail) (KSAppDelegate.m:59)
Here I can see that the notification that was being posted was probably an
NSApplicationDidFinishLaunchingNotification starting off some methods in my
app delegate. I then load the accounts preferences, which would make sense to
call the ACAccountStore method, but then dealloc is called. Seeing this was
an immediate red flag since KSAccountsPreferences should be retained since it
provides information about available accounts to the rest of the application.
I had another crash report from a different issue that was a little bit harder
to parse without symbolicating the methods.
Process:         Sail [47027]
Identifier:      com.keithsmiley.SailOSX
Version:         1.2.0 (4)
Code Type:       X86-64 (Native)
Parent Process:  launchd [45696]
User ID:         502

Application Specific Information:
*** Terminating app due to uncaught exception 'NSRangeException', reason: '*** -[__NSArrayM objectAtIndex:]: index 0 beyond bounds for empty array'
abort() called
terminate called throwing an exception

Application Specific Backtrace 1:
2   CoreFoundation                      0x000000010c5008ec -[__NSArrayM objectAtIndex:] + 252
3   Sail                                0x000000010b838eed Sail + 61165
4   Sail                                0x000000010b838f36 Sail + 61238
5   Sail                                0x000000010b838b19 Sail + 60185
6   Sail                                0x000000010b83785d Sail + 55389
7   libdispatch.dylib                   0x000000010fa07f01 _dispatch_call_block_and_release + 15

Binary Images:
  0x10b82a000 - 0x10b89dff7 +com.keithsmiley.SailOSX (1.2.0 - 4) <47EC2733-B543-31EA-A6AA-9D998FB65803>
Obviously this was caused by an invalid access to an array but that's a little harder to track down. So I again used atos with the dSYM and new memory location.
0x000000010b838eed
-[KSAccountsPreferences selectedADNUser] (in Sail) (KSAccountsPreferences.m:238)
0x000000010b838f36
-[KSAccountsPreferences selectTwitterUsername] (in Sail) (KSAccountsPreferences.m:243)
0x000000010b838b19
-[KSAccountsPreferences populateTwitterAccounts] (in Sail) (KSAccountsPreferences.m:211)
0x000000010b83785d
__36-[KSAccountsPreferences viewDidLoad]_block_invoke (in Sail) (KSAccountsPreferences.m:70)
This ended up giving me the exact line where out of bounds issue was happening
depending on a certain number of accounts. I noticed that this issue had been
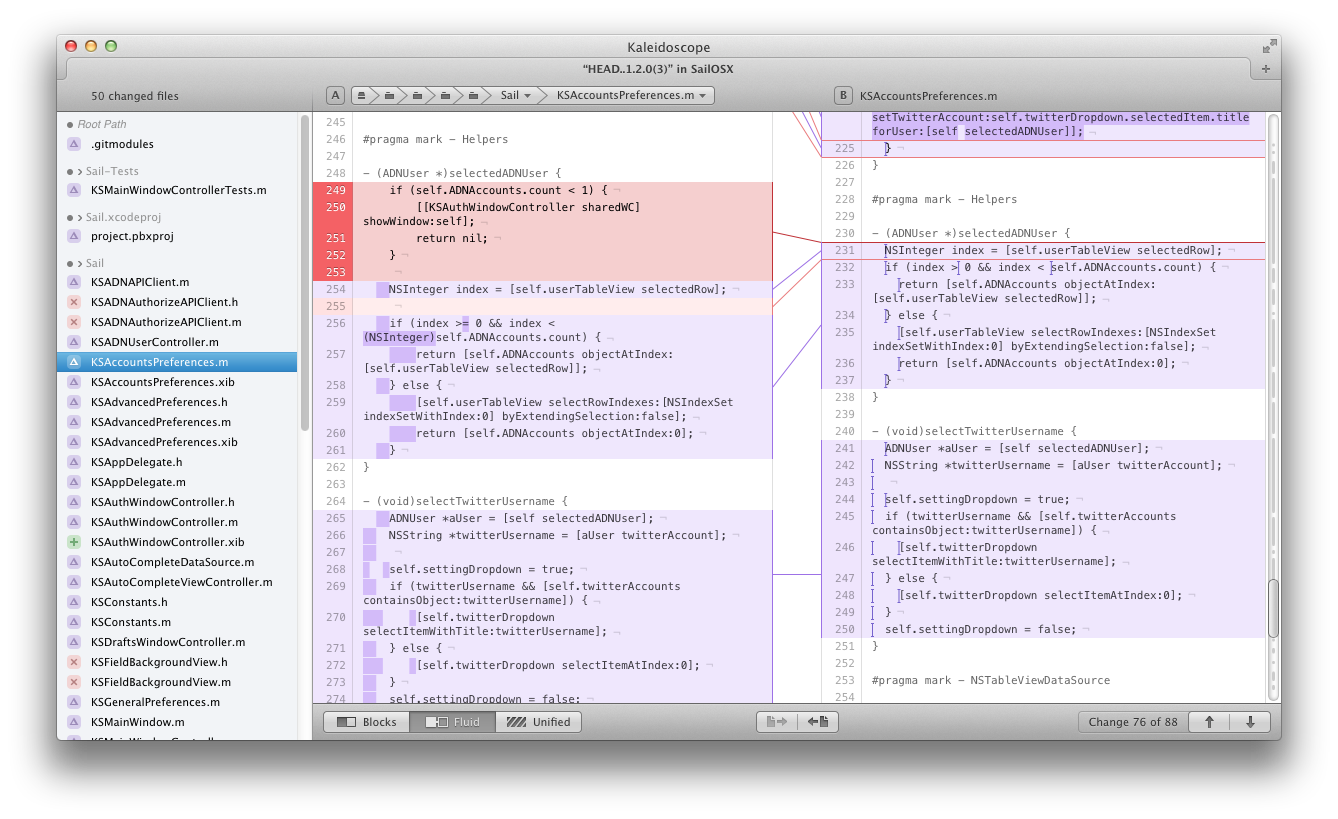
fixed since my last release so I did a diff on the tag I created for that
specific release with
git difftool HEAD..1.2.0\(3\)
Then in Kaleidoscope I was able to figure out
what changed had fixed the issue. Just because it's so pretty here is what it
looked like.
Symbolicating crash reports is definitely vital to tracking down bugs your users
are experiencing when you can't reproduce them yourself. Once you figure out how
it's obviously worth it.
]]>
<![CDATA[The 'Best' Text Editor]]>http://smileykeith.com/2013/05/22/the-best-text-editor2013-05-22T00:59:00-07:00
I'm tired of people asking about the 'best' IDE for xyz purpose. The answer to this question is there is no best. The answer is always 'it depends.' Not only does it depend on what you're doing but more importantly it depends on you. It depends on your work flow. It depends tons of other indiscernible factors.
It seems like people think they work in exactly the same way as enough other people. That asking this question will yield a useful result. The truth is that there are far fewer text editors than people who need text editors so it's impossible not to overlap with someone. We misconstrue this overlap in thinking that now this person knows exactly what we want. In reality they just happen to share some arbitrary subset of the way we work and therefore ended up with the same text editor.
So how can you decide which editor is best for you? Try them. This sounds obvious to you? Good, this article is not for you and you can safely leave now. These days text editors are either free, cheap or have trials. So download them all try them out and see if they make sense to you. Weed out the ones you really hate or the ones that crash and spend a little more time with the remaining editors. Some, like Vim, you may have to spend a little more time with to grasp but this still doesn't seem like a high order.
But please stop asking questions on StackOverflow and similar sites where you expect people to throw their vote into the hat for the 'best' editor and make a decision for yourself.
]]>
<![CDATA[Objective-C on Travis-CI]]>http://smileykeith.com/2013/04/11/objective-c-on-travis-ci2013-04-11T15:58:00-07:00
Recently Travis added support for Objective-C and there for OS X and iOS projects for continuous integration testing. I gather that people have previously done this with self-hosted dedicated Jenkins machines but since Apple is so aggressive about dropping support for previous versions of the OS it seems like a pain to have to replace your build server every few years. Enter Travis, a great hosted continuous integration server that hosts a huge amount of open source projects. I figured with this new support I could host some of my smaller libraries just to set how well it worked. The initial setup process was a bit tedious but I eventually got it to work.
Assumtions:
You have a test framework already integrated with your project (I like Specta/Expecta)
You have your project on Github in a public repository. Travis offers a pro account if you'd rather
Steps
Create a .travis.yml file in the root of your repository (leading dot is intentional). For many projects a file may just look like:
language:objective-c
By default Travis runs this script for Objective-C projects I was informed on Twitter that the current script that runs Objective-C projects is actually located here. It was originally created by Justin Spahr-Summershere. This script seems to run my projects without any issue, they just occasionally require more initial setup (we'll get to that).
Enable your repository in Travis' settings. From your Travis profile page (after signing in with Github) you should see a list of your repositories, you may have to press 'Sync now', where you can switch on the repository you're planning on adding.
Configure your project within Xcode. As I assumed above you already have a test target setup. You do have to do a few things in Xcode to make everything work correctly.
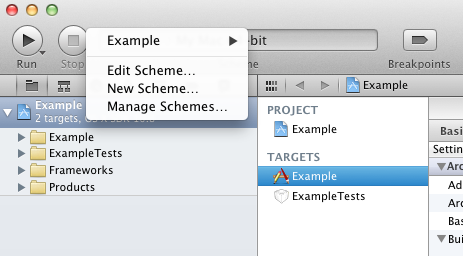
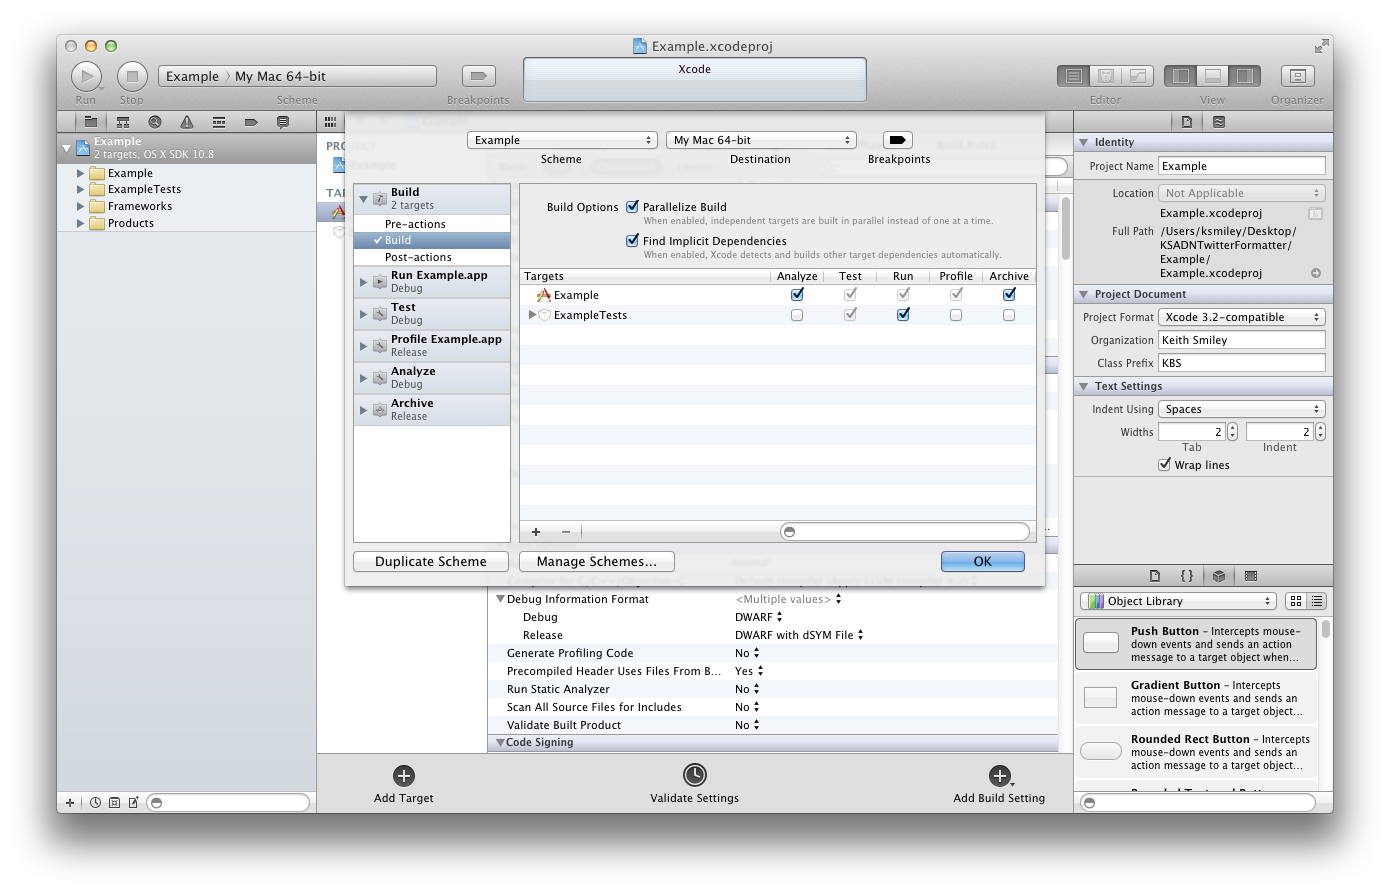
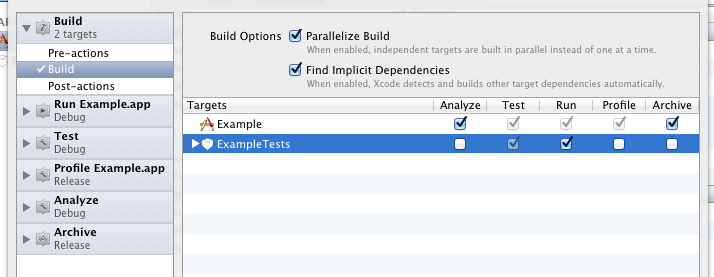
Go to 'Manage Schemes' in Xcode.
Check the 'Shared' box for the scheme that needs to be run.
Click 'Edit…' in the bottom left and go to your build action.
On the row of your Tests target check the box in the 'Run' column.
At this point for a simple project or a project using CocoaPods you should be good to go. If Travis finds a Podfile in the root of your repository it automatically runs pod install to get your dependencies (from their docs). Otherwise there are a ton of configuration options for your .travis.yml depending on how your repo is setup.
For one of my projects I created a setup.sh file at the root of my repo that looks like this:
#!/usr/bin/env bash
git submodule update --init--recursiveecho"Setting up test frameworks..."cd Example/Vendor/Specta; rake > /dev/null
cd ../Expecta; rake > /dev/null
echo"Done"cd ../../../
This script which I run using the before_install: ./setup.sh option in my .travis.yml gets all my submodules, sets up Specta and Expecta and then goes back to the root directory for running. If you just have a few simple steps you can also have multiple before_install actions like:
before_install:-cd Example-make
You can read more about other Travis configuration options in their documentation.
]]>
<![CDATA[OS X + ZFS]]>http://smileykeith.com/2013/02/21/os-x-plus-zfs2013-02-21T11:28:00-08:00
For a long time people have talked about how horrible HFS+ is. Most notably, in my opinion, Linus Torvalds (the creator of Linux and Git) who said "Their file system is complete and utter crap, which is scary." John Siracusa also wrote about the problems with HFS+ in his 10.7 review along with talking about it on his podcast, Hypercritical in episodes 56 and 57.
The gist of all this really is that Apple needs a new filesystem. It has been a while since Apple had ZFS support on their website for release in Snow Leopard. After which Apple dropped ZFS support because of licensing issues. There had been talks of Apple developing their own file system, although I think that's the wrong way to go. I think Apple needs to approach file systems the way they approached Safari with Webkit. I think they would be best served by picking up a liberally open source file system, such as BTRFS, or grabbing up one of the ZFS ports and continuing development while leaving it open for anyone to use. One of the great things about this approach is exactly what happened with Webkit and Google Chrome. Google decided to use the Webkit engine to make a product that competes with the main developers of the Webkit project. By doing this with a file system other vendors could use the same implementation and therefore increase development and in turn stability of whichever system was chosen (not to mention compatibility).
One thing is for sure. People who understand how integral a file system is want something modern.
]]>
<![CDATA[Terminal Shortcut in OS X]]>http://smileykeith.com/2013/02/08/terminal-shortcut-in-os-x2013-02-08T09:59:00-08:00
One of my favorite defaults in some Linux distros is the ability to use CTRL+ALT+T to open a new terminal window. I wanted to enable this same functionality in OS X using Quicksilver. I did this using iTerm 2 but you can do it with the default Terminal if that's what you want.
Enable the Terminal and iTerm2 Quicksilver plugins.
Create a new custom hotkey trigger. Using the Home directory with the action Open Directory in Terminal
Set it's hotkey using the drawer to whatever you want.
Set your default Command Line InterfaceTrigger to iTerm (if that's what you want)
You're done! Now you can easily press your hotkey and pull up a new iTerm/Terminal window whenever and wherever.
]]>
<![CDATA[Automated Google Reader Backups]]>http://smileykeith.com/2013/02/01/automated-google-reader-backups2013-02-01T12:30:00-08:00
I spend a lot of time in my RSS Reeder (see what I did there?). I still find Google Reader to be the best and easiest way to manage my subscriptions, although I've been wanting to switch to Fever for a while.
One thing I wanted to do when I launched my new site (the one you're reading) was to have a downloadable up to date export of my Google Reader OPML file (which of course I never did). I looked around for good ways to automate this and I found a simple Python script to do it with (sorry I couldn't find it again for this post). I decided to rewrite it in Ruby and set it up on my server as an automated cron job.
To run the script I came up with use something like:
#!/usr/bin/env ruby## => This script will authorize your Google credentials and download your Google Reader subscriptions# => Usage: ./googleReaderOPML.rb GOOGLEUSERNAME PASSWORD## The required networking shenanigansrequire'uri'require'net/http'require'open-uri'require'rubygems'# This requires the 'colorize' gem. Install with '[sudo] gem install colorize'require'colorize'# The base Google URLs for callback, authentication, and subscription export$GOOGLE_URL="http://www.google.com"$LOGIN_URL="https://www.google.com/accounts/ClientLogin"$READER_URL="http://www.google.com/reader/subscriptions/export"# The user agent string, for some reason this is required, feel free to change it$SOURCE="keith.so"# The default output filename, it is automatically overwritten if one already exists$FILE_NAME="googlereadersubscriptions.opml"# Make sure there is the correct number of argumentsifARGV.count!=2# Print the instructionputs"Usage: ./#{File.basename(__FILE__)} USERNAME PASSWORD".redexitend# Build the request URLuri=URI.parse($LOGIN_URL)# Setup the Parametersparams={Email:ARGV.first,Passwd:ARGV.last,service: "reader",source: $SOURCE,continue: $GOOGLE_URL}# Add the user-agent string, my website (feel free to replace it) to the headersheaders={"User-agent"=>$SOURCE}# Encode the parameters into the urluri.query=URI.encode_www_form(params)# Create a new NET:HTTP object with the request URLhttp=Net::HTTP.new(uri.host,uri.port)# Require HTTPS without this net/http will not be happy with youhttp.use_ssl=true# Execute the requestrequest=Net::HTTP::Get.new(uri.request_uri,headers)# Get the data from the requestresponse=http.request(request)# Check for valid response code, should ONLY be 200ifresponse.code!='200'puts"Google returned #{response.code}, check your username and password".redexitend# split each token into a different item then load them each into a hash with the key as the token keyauth_hash=Hash.newresponse.body.split(/\n/).eachdo|token|split_array=token.split('=')auth_hash[split_array.first.downcase]=split_array.lastend# Create a header hash for the request of the XML fileheaders={"user-agent"=>$SOURCE,"cookie"=>"Name=SID;SID=#{auth_hash['sid']};Domain=.google.com;Path=/;Expires=160000000000","authorization"=>"GoogleLogin auth=#{auth_hash['auth']}"}# Open the URL for the Google Reader export with the setup headersrequest=open($READER_URL,headers)# Open the received XML feeds filegoogle_reader_file=File.open(request,'r')# Read the entire feeds file into 'subscriptions'subscriptions=google_reader_file.read# Close the downloaded filegoogle_reader_file.close()# Open a new file with the global filename to write to, overwrite it if it existssubscriptions_file=File.open($FILE_NAME,'w')# Verify the file was createdifFile.exists?(subscriptions_file)# Write the subscriptions to the file and close itsubscriptions_file.write(subscriptions)subscriptions_file.close()# Display a success messageputs"Wrote Google Reader subscriptions to #{$FILE_NAME}".greenelse# If the file wasn't created print an errorputs"Couldn't write to #{$FILE_NAME} (the process running this script may not have sufficient privileges".redend
]]>
<![CDATA[Boredom]]>http://smileykeith.com/2013/02/01/boredom2013-02-01T11:03:00-08:00
Working as a developer full-time can be very exciting. Dealing with new interesting problems gets me up in the morning. But I still find that after a few months of a specific project I find myself less and less interested with it. Not only projects but concepts and languages start to become less interesting. First it was websites then Objective-C then Ruby then C and now who knows. This scares me. At this point in my life I hope to work in this field for my 'career' meaning a significant amount of time. Yet I can't even keep myself working on a single project now, much less one that doesn't interest me.
I typically blame this on the difficulty of the project. As a lone developer I find that most projects I work on are pretty small in scope, since I just don't have the time or people-power to work on anything larger. Therefore I look at most of my projects without interest. I'm not sure what it will take to keep myself engaged and interested on my next project.
]]>
<![CDATA[Learning C]]>http://smileykeith.com/2013/01/27/learning-c2013-01-27T22:59:00-08:00
I've been using Objective-C and C++ for a while now. While I feel like I know them pretty well I had absolutely no grasp on C itself. Obviously when using those languages you pick up a bit about data types and conditionals but you couldn't take that knowledge and completely write something non-trivial in C. Because of this I figured it might be worth some time so I started looking for viable resources. In that search I found Learn Code the Hard way. They publish physical and online books on different languages and so far I've found it to be a delight. It's not your typical easy walk through and on lessons 17 (of 51) you'll start actually having to think. This for me has been much better so far than typically online learning where the introductory course ends on how to write a for loop.
If you're interested in picking up a C background I would definitely recommend you start here.
]]>
<![CDATA[NSTableView vim keys]]>http://smileykeith.com/2013/01/08/nstableview-vim-keys2013-01-08T16:19:00-08:00
I'm currently working on a OS X application that uses a few different NSTableViews to display user data. I was testing them out a bit to make sure multiple deletions worked correctly from my database and I found myself pressing 'j' and 'k' to try and move down and up. I decided it would be pretty cool to implement those two vim shortcuts into my table view just in case anyone else thinks like me.
This functionality already exists in The Hit List an awesome GTD app that has a lot of baggage with me, and I'm sure it exists in other applications as well.
In my NSTableView subclass' keyDown: method I tried a few things.
Attempt 1: First I tried to re implement the functionality myself. In retrospect this doesn't make any sense but at first it was pretty simple. It looked something like this.
The issue with this is the way NSTableView typically expands it's selection. I think of it as a pivot point where you start. Then you go up and down relative to that point. So if you start at index 2 and go down till index 4, you should have 2 rows selected. Then when you go back up you should deselect the rows and indexes 3 and 4 and select the rows and index 1 and 0. At this point I realized it was more difficult than I realized at first and went in search on another solution.
if([theEventkeyCode]==38){// The letter 'j'CGEventRefe=CGEventCreateKeyboardEvent(NULL,(CGKeyCode)125,true);CGEventPost(kCGSessionEventTap,e);CFRelease(e);}elseif([theEventkeyCode]==40){// The letter 'k'CGEventRefe=CGEventCreateKeyboardEvent(NULL,(CGKeyCode)126,true);CGEventPost(kCGSessionEventTap,e);CFRelease(e);}
This solution worked perfectly, at first. This mainly emulates a key press with a different key code. So as you can see I was catching j and k and spitting them out as down and up. I spent a few minutes testing this before I remembered that I had sandboxing disabled so I could more easily delete my application support folder while messing with my Core Data stack. There went that solution.
Attempt 3: Before I used the weird CGEventRef solution I tried to create my own NSEvent passing it all the same attributes from the original event (all this code is being used in the keyDown: function of my subclass) but I couldn't figure out how to get the correct character string for the up and down arrows. I typically use Key Codes to get all the possible information you could want about each key you press. But for some keys, including the arrow keys, it returns garbage for the character code. Then I discovered this answer on StackOverflow where there is a brief mention of NSUpArrowFunctionKey. With that I came up with this.
Not the prettiest solution I but one that seems to work perfectly, even sandboxed, to provide the expected behavior in an NSTableView subclass.
]]>
<![CDATA[Backing up with Capistrano]]>http://smileykeith.com/2013/01/05/backing-up-with-capistrano2013-01-05T12:12:00-08:00
We all know not backing up has consequences. While losing sentimental files would definitely ruin your day, losing your web server's data could be even worse. I've mentioned before that I use Linode for my server hosting, and while they do offer an automated backup service I decided I'd rather setup my own solution to back up periodically to my local machine.
Many people use rsync to do their server backups. In fact Linode even has a guide on how to set it up (there's a better one here). I decided that instead of a 1 for 1 directory backup, I would prefer to have a tarball of the contents. While I could've easily done this with a few bash commands from the server that's not particular ideal for my setup. My local machines don't run 24/7 so if I set it up on the server to automate the backup every week, it may try to initiate the backup when my machine was off (I could try to guess when it's on every week but that's not ideal either).
The obvious solution to this is run it from my local machine instead every week. That way once a week when it's powered up it would log in to the server, create the tarball and pull it down. Insert Capistrano ([sudo] gem install capistrano) a RubyGem for 'Remote multi-server automation.' So I wrote a very basic Capfile to automate this for me (replace the path to your www folder accordingly).
load'deploy'$SERVER_USER="username"$SERVER_IP="1.1.1.1"desc"Backs up server www files"task:backup,:hosts=>$SERVER_IPdorun"cd /srv; tar -pvczf ~/backup.tar.gz www/"run_locally"scp #{$SERVER_USER}@#{$SERVER_IP}:~/backup.tar.gz ~/Dropbox/Backups/Server"end
Then I added this to my crontab on my local machine by running crontab -e and adding the line:
I included the path to the Capistrano executable since cron (on OS X) executes tasks with sh, which isn't setup with my $PATH.
]]>
<![CDATA[Raking Podspecs]]>http://smileykeith.com/2013/01/04/raking-podspecs2013-01-04T11:09:00-08:00
I spend a decent amount of time these days helping maintain the CocoaPodsspecs repo by managing pull requests and issues. CococaPods is an awesome dependency manager similar to Rubygems for Objective-C projects. Unfortunately a lot of submitted podspecs haven't been correctly formatted or they're missing required information. CocoaPods has an awesome build in command pod spec lint that allows you to make sure the spec is valid and complete. Understandably people who are new to CocoaPods trying to submit their libraries are unaware of this awesome tool. Therefore when I look through the pull requests, I like to lint them myself (CocoaPods does utilize Travis but unfortunately it can't do everything).
Since CocoaPods supports multiple versions of Ruby (1.8.7 and 1.9.3) to be complete ideally you'd lint them on both versions. Tools like RVM and rbenv(my tool of choice) make it easy to quickly switch between different versions of Ruby using .rvmrc and .rbenv-version respectively. As you can probably assume I wanted to automate this. So I wrote a quick Rakefile to do this for me.
#!/usr/bin/env rake# NOTE: Must be using rbenv 4.0 to use `system` and `.ruby-version`## Set your preferred ruby versions$V18='system'$V19='1.9.3-p385'$RBENV='.ruby-version'# The gem to use$GEM='cocoapods'task:default=>:linttask:c=>:cleandesc"Lint podspecs on multiple versions of ruby with rbenv"task:lintdoifDir.glob('*.podspec').count<1puts"No podspecs in #{Dir.pwd}"exitendexisted=versionFileExists?ifexistedold_version=currentVersionend# Loop through all podspecsDir.glob('*.podspec').eachdo|file|# Loop through ruby versions2.timesdo|x|version=x==0?$V18:$V19writeVersion(version)puts"Linting #{file} on Ruby version #{currentVersion}"putslint(file)endend# If the dotfile already existed rewrite the original codeifexistedwriteVersion(old_version)elseFile.delete($RBENV)ifversionFileExists?endenddesc"Delete all podspec files"task:cleandoDir.glob('*.podspec').each{|file|File.delete(file)}Dir.glob($RBENV).each{|file|File.delete(file)}end# Check to see if the current dotfile existsdefversionFileExists?File.exists?($RBENV)end# Retrieve the current version from the rbenv dotfiledefcurrentVersionFile.open($RBENV,"r"){|io|io.read}end# Write out a version to .rbenv-versiondefwriteVersion(version)File.open($RBENV,'w'){|file|file.write("#{version}")}end# Run the lintdeflint(podspec)%x[pod spec lint "#{podspec}"]end
]]>
<![CDATA[Spawning iTerm Windows]]>http://smileykeith.com/2013/01/03/spawn-iterm2013-01-03T12:34:00-08:00
I've recently been searching around for a good way to 'spawn' an iTerm window (no I don't use tabs in iTerm), at the pwd in my current iTerm window. I couldn't find any good way to do it so I jumped in to AppleScript Editor and made something happen.
function spawn {
osascript ~/Dropbox/Code/Applescript/Spawn/SpawniTerm.applescript $PWD}
Now I can call spawn from any iTerm or Terminal window to open a new iTerm session wherever I called it from.
]]>
<![CDATA[NSWindow Global Hotkey]]>http://smileykeith.com/2013/01/03/nswindow-global-hotkey2013-01-03T10:44:00-08:00
For quite a while I was having trouble dealing with a global show/hide hotkey for windows in Objective-C. Global hotkeys are already hardenough. Although MASShortcut has solved that. Yes I know of ShortcutRecorder but it's very dated (MASShortcut even uses blocks!).
I found that once I had the shortcut working I was having a hard time dealing with opening and closing, showing and hiding the application. What seemed to happen was when the method was called and [[NSRunningApplication currentApplication] isActive] was evaluated in an if statement along with an else clause, if the application was hidden using [[NSApplication sharedApplication] hide:self]; it was reevaluated and it hit the else case. This also happened with an if statement checking if the window was already visible with [myWindow isVisible] even with return; statements inserted in appropriate places.
My solution was adding NSNumbers acting as booleans to keep track of the value allowing me to avoid else statements altogether and use else ifs instead.
]]>
<![CDATA[Linode Setup]]>http://smileykeith.com/2013/01/02/linode-setup2013-01-02T15:19:00-08:00
I've been using Linode for about the past 4 months. I was previously using HostMonster for all of my hosting, while I would recommend them 80% of the time, Linode and the nature of a VPS allows many things you cannot do with shared hosting.
I was looking around for some recommendations on how to deal with user accounts and permissions and ran across this great article that has almost every piece of information you need to get your server from nothing to deployed.
Linode allows you complete control over your VPS which, for beginners (like me when I started with Linode), difficult to get started with. Just follow this guide and you'll be good to go.
]]>
<![CDATA[The fear of shipping]]>http://smileykeith.com/2012/12/12/the-fear-of-shipping2012-12-12T17:42:00-08:00
Something I've become very aware of lately is how difficult it is for me to ship. I have at least a dozen unfinished projects that I could probably ship, yet I find any excuse to hold them back.
I could say forget it and ship it. Then depending on the amount of feedback I received, decide whether or not it was worth putting more time into. I often fall victim to "just one more feature here" or "oh it would be great if I added this first." When I should have just shipped.
After nearly convincing myself to do this, what is holding me back? The fear of ruining my first impressions. Up to this point my programming career, especially in public, has been pretty sparse. I've made a few websites, and I shipped an internal enterprise iOS app, but that doesn't count for much. So as far as most people know I sit at home on my thumbs 24/7 occasionally tweeting about Objective-C frameworks. I want to be perceived well in the community, I respect a lot of indie iOS and OS X developers and the last thing I want is attention for an unfinished or unpolished product. I am starting to realize that this is unrealistic. I would love my first major application to be perfect but that's just not feasible. I hope to get there in the future, but I am very close to accepting that getting there requires stepping stones. For me, those stepping stones might be some useless OS X utilities that I've made for myself and now want to share with the world. No matter how unpolished.